Windows 10 on a stick marks the end of an era.
Remember the days when we had to pay to get a replacement for a lost Windows installation disk? Looks like those days are long gone, at least according to screenshot images released by German site WinFuture.de, depicting price listings of Microsoft Windows 10, as a bootable USB flash drive.
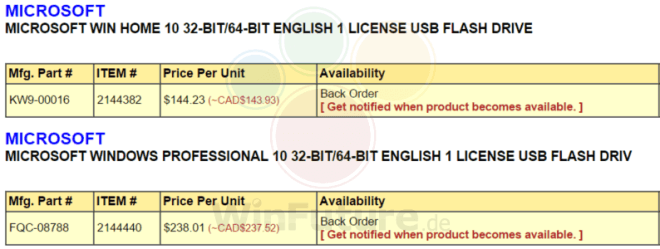
If the rumors are true, as well as the genuinity of the surfaced screenshots, Microsoft Windows 10 could be the World’s first mainstream operating system to provide consumers with an option to purchase installation media in USB form. While the format is not new to tech enthusiasts and “DIY’ers”, providing installation media through USB has never been considered, primarily due to the learning curve associated with consumers having to change BIOS settings in their computers, in order to boot their systems directly into the USB drive, which is one way to perform a clean installation.
What’s the difference between DVD-based and a USB-based installation media?
As it turns out, the above step is no longer necessary. Most installation processes, not only for Windows, are designed to already prepare the first sector of the hard drive to automatically boot into the installation process, presenting users with the option of installing Windows on their next reboot, without the need to configure their computer to boot into the USB drive to continue the setup process.
The typical steps involved in installing Windows via USB are rather simple and can be done in two ways: the easy way, and the “nerdy” way.
The easy way requires the user to be able to boot into the existing version of Windows to be replaced by Windows 10. When inserting the USB installation media into a USB 3.0 port (which is strongly recommended for speed and reliability), the system should recognize the media and automatically start the setup program. If that’s not an option, the media will need to be opened using File Manager, and manually look for the executable setup file, which is typically easy to locate, as it’s clearly marked, and often the only *.exe file that is not within a folder.
Once the setup program starts, it typically offers a number of options, such as a clean installation, an upgrade of an existing system, or a repair option, if something is wrong with an existing Windows 10 installation.
Regardless of the option chosen by the user, each process that follows is typically almost entirely automated, and designed to be as clear and intuitive as possible, which is a first for a Windows-based operating system. Each required restart will lead right back into the setup process routine, without falling back to accidentally booting into the existing operating system, which used to be the main problem that hindered mainstream adoption of USB-based installation media in the past.
The “nerdy” way, is not far off the above illustrated process, although it does require a bit more involvement, and possibly a tech-savvy person’s assistance, as a precaution:
The first step is to ensure that the Windows 10 USB installation media is in a USB 3.0 port, as previously mentioned, to ensure reliability of the installation, as well as a faster setup process. Next we’ll turn on the system from a completely powered-down state, or we’ll restart it, and repeatedly press either the Delete key or F2, depending on the manufacturer of the device. In some laptops F2 is more common, while on desktop systems, the Delete key is more widely encountered.
Warning:
The following steps involve interaction with software that has a direct effect on how the hardware on your system will respond by default, which translates into “hit the wrong thing and bad things will happen”.
Depending on the age of the system, a BIOS setup screen will display with either mouse support of completely keyboard based. If mouse support is available, chances are that the setup screen for the system in question is relatively advanced, and in some cases may allow to choose which drive boots first, simply by clicking on an icon of that drive.
In the case of older setup programs, instructions on how to navigate the interface are typically found either at the bottom of the screen, or on the side. Typically, system setup interfaces have only up to 3 of 4 screens to slip through before finding the option to choose which drive has boot priority, and in most cases saving changes involves pressing F10, unless otherwise stated in the on-screen instructions.
The USB installation media is usually clearly labelled and easily identifiable, with “Windows 10” spelled out clearly, as long as it’s a genuine copy issues by Microsoft... which doesn’t make much difference anyway, as the authentication process occurs online.
At this point, if the drive configuration is done correctly, the Windows 10 USB stick drive will be the first drive where the system will look for a boot sector to start the computer with. We’ll confirm this by restarting the computer from the BIOS configuration utility, typically by pressing F10, or other “save and restart” option provided by the utility.
As the computer restart, the next thing that should appear on screen is a white line of text asking to either wait for the setup process to start, or press any key to skip and continue with the regular booting into the existing operating system.
After a short wait, the setup system will start, and on-screen instructions will offer the same three options described earlier: to perform a clean install, upgrade an existing Windows installation, or perform a repair of an existing Windows installation.
Performing a clean install will allow users to perform hard drive partitioning and formatting operations, which will completely erase any trace of existing data on the computer for the purpose of a clean, brand new installation of Windows 10.
Typically, the process of partitioning and formatting is an inherently scary process for most regular users, however, when it comes to performing a fresh installations, there is virtually no risks involved in formatting a drive that must be wiped anyway.
If losing existing data is not desirable, we’ll choose to simply upgrade the host operating system to Windows 10, which can only be done from Windows 7 and Windows 8/8.1.This option will not require any partitioning or formatting, and will import all applications and data from the outgoing operating system, into windows 10, including all personal settings.
Whether a fresh installation or an upgrade are performed, step by step instructions have been created that will make the process of installing Windows 10 very easy, with 90% of the upgrade process, or install, being completely automated.
Advantages of using a USB stick drive, versus an optical medium
The obvious advantage is speed and reliability. Flash memory is much faster, and doesn’t rely on moving parts. Installation media like DVDs and CDs can be easily damaged on contact or by long-term exposure to dust and other environmental factors. Also, optical readers are subject to wear and tear, at an even faster pace than regular hard disk drives, in respect to solid state drives.
optical media is in many respects, at least in regard to software, a dying media that is quickly losing relevance to online options.
If the rumors are true, this could turn out to be a very smart move by Microsoft, as it provides an even easier way to upgrade, for users looking for alternative ways to upgrade to Windows 10.