Tutorial: Upgrade your laptop's HDD to an SSD
As we get closer to the official release of Microsoft Windows 10, owners of laptop PCs are beginning to wonder how fast Windows 10 will run on their devices.
From what we have seen, Windows 10 seems to make much better use of hardware resources than previous versions, especially considering the smaller footprint of the operating system itself on the hard drive, which makes Windows 10 one more reason to consider upgrading an existing HDD to SSD, especially as we follow the inversely proportional trend of SSD prices falling while storage size increases.
Basic requirements:
Replacing an internal HDD with and SSD, requires a laptop PC that supports solid state drives, and that is able to run at least Microsoft Windows 7. It’s strongly recommended to perform this operation on a laptop PC built after 2008.
Finding the right SSD for your laptop
The easiest way to find out what type of hard drive you need is to look up the specs of your existing laptop, from the original manufacturer’s website.
Most regular laptops will have 2.5 inches drives, but many ultraportable laptops will use smaller form factors, typically 1.8 inches.
If your laptop was built prior to 2008, it’s important to understand that upgrading might not be worth it, considering the age of the hardware, but if you elect to replace storage on an older laptop, it’s worth noting that 2.5 inches laptop IDE drives have different thicknesses too, typically between 7mm and 9.5mm, depending on the age of the drive.
Once you have narrowed down the type of SSD you need, you will want to have an external SATA enclosure. The enclosure must fit at least a 2.5 SATA drive, and is designed to house most SSD’s.
Finally: a small Phillips screwdriver.
Ready for Step One? Let’s begin by backing up all your important data.
Since there is a chance that the original hard drive is larger than the newer SSD, typically in the realm of 500GB or larger, we need to find out first how much space is required for a full backup. If the storage required is bigger than the available space on the SSD, some of that data must be either compressed, or moved to an external source, until the volume of data to be backed up is small enough to fit the new SSD.
Step 2: the clean-up
If you are using Windows 7, open File Manager and navigate to the top, where you have a view of all your drives. Right click on your C: drive and click Properties.
Locate “Cleanup System Files”, which is a button typically found in the General tab. This procedure will clean up your HDD from all temporary files, freeing up more space. In Windows 8 this same feature can also be found by searching for Disk Cleanup.
Additionally, third party software like CCleaner can also be useful, especially on particularly old file systems.
Step 3: Initialize the new SSD
For this step, we need to insert the new SSD into the external enclosure, and plug the enclosure into the laptop’s USB 3.0 port. Using 2.0 is not recommended, as the lower voltage and lower transfer speed could cause errors, especially if the enclosure doesn’t come with an additional power supply.
Once plugged in, the new drive will be instantly recognized by the system. Open “Disk Management Tool”, which, in Windows 7 is typically found under “Administrative Tools”, in “Control Panel”. In Windows 8, simply search “Disk Management”.
Next, let’s choose “Create and Format Partitions”. This will display an overview of all drives present on the system, including the ones that may or may not be accessible or have a drive letter assigned.
Locate the new SSD. The easiest way to identify it would be by looking at its size. If the drive is brand new, chances are it may or may not be initialized for usage. In the latter case, it will show a black bar, while every other drive will have blue bars.
If the drive is not yet initialized, right click on the new drive and choose “Initialize Disk”. This will format the new drive. Once the process is complete, note its new size for future reference.
Step 4: bring the local drive down to size
In Disk Management, we need to resize the local C: drive down to the same size as the new drive, or smaller. This will not affect the data on the drive. It will merely shrink the partition to a size that will fit the new drive as we clone the local partition onto it.
To shrink the local partition, we will right click on the local partition, typically labeled “Windows8_OS”, or similar identifiable text, and choose “Shrink”.
The Shrink dialog will display the minimum allowable size the local disk can be shrunk down to. The number inserted in the box labeled “enter the amount of space to shrink in MB” must not be less than the number displayed in “Size of available shrink space in MB”.
Finally, click “Shrink”, to begin the process.
Once the partition is shrunk, restart your laptop to verify that the partition works.
Step 5: cloning the local drive to the new SSD
The process of cloning the local drive to the new SSD is fairly straightforward, but it does require third party software to accomplish.
In this example, we’ll use EaseUS Todo Backup Free, which also supports Windows 10. Within EaseUS Todo Backup Free, we will select “Clone” from the main menu bar. Next we’ll follow the wizard guiding us to select C: as the source drive to clone, and then the SSD as the destination drive. When selecting the new SSD, check “Optimize for SSD”.
Click “Proceed”, then click on “Shut down computer when the operation is complete”. Depending on your hardware, the process might take up to 45 minutes to complete.
Additional step 5a: verify the new drive boots up
If your laptop’s bios allows it, attempt to boot from your external drive, and see if it works. If Windows boots normally, it’s time to move onto the next step.
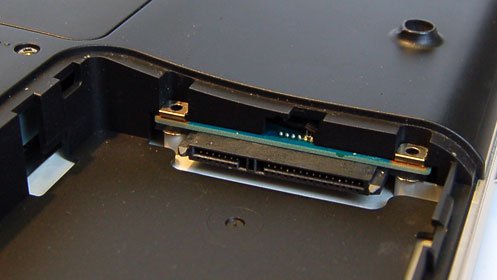
Step 6: Swap drives
Turn the laptop off and disconnect it from any power supply that may be connected to it. Also disconnect the external drive and any other connectors, until the laptop is completely isolated from external devices.
Using the Phillips screwdriver, remove the back panel and identify the local drive, which will match the size of the SSD.
Remove any screws that may hold the local drive in position, and lift the drive, gently, until it’s at a slight angle. Next, pull the drive, until it disconnects from the SATA interface connector. Do not attempt to twist or move the drive sideways while extracting it.
Replace the HDD with the SSD, by inserting the new drive in the exact same connector, and secure the new drive using the same screws.
Finally, replace the back panel.
Additional Step 6a: turn the old HDD into an external drive
Use the external enclosure where the new SSD was in originally, to house the old HDD.
Step 7: Boot up the laptop
With the new SSD as your main local storage drive, turn on the laptop. You should see your laptop booting up into Windows.
The improvement in speed and performance should be noticeable at this point.
With the old drive in the enclosure, we can now plug the external drive into the laptop and, if everything works as it should, we can safely wipe the old drive and use it for additional storage.
Too much work?
We understand that not everyone feels confident about disassembling a laptop, so the steps above may not be for everyone. If you prefer to have your laptop upgraded by the professionals, PortableOne.com offers a wide array of upgrade services specially tailored to your specific needs. To contact one of our specialists, email us at support@portableone.com.