How and when you should restore your Mac to factory settings
While restoring an Apple MacBook to factory settings seems rather radical, there are many situations in which a complete reset is the way to go. For instance, when upgrading to a new model, and wanting to pass an older MacBook down to someone else, or selling it, it’s important to ensure that the device is scrubbed of all personal information, settings and apps, before its gets transferred to another user.
This also includes de-authorizing the Apple ID of that device, as well as other settings that bind the MacBook to the original owner, which is the most important thing, because selling a device that is still bound to an Apple ID, means that that device will still be able to track all other associated iOS devices as well, which equates to selling a complete stranger, the perfect stalking tool.
Backing Up
When getting rid of an old Mac, it may be useful to make a copy of all files, settings and app to be restored into a newer device. When using Time Machine to create a backup of your old Mac, consider purchasing an external drive, as a complete MacBook backup can take more space than the average thumb drive, and way more than iCloud allows on a free subscription.
The basics
When resetting a MacBook, it’s important to ensure that the device can rely on two things: stable Internet connectivity, and a power outlet, to avoid the device from running out of battery power in the midst of a reset.
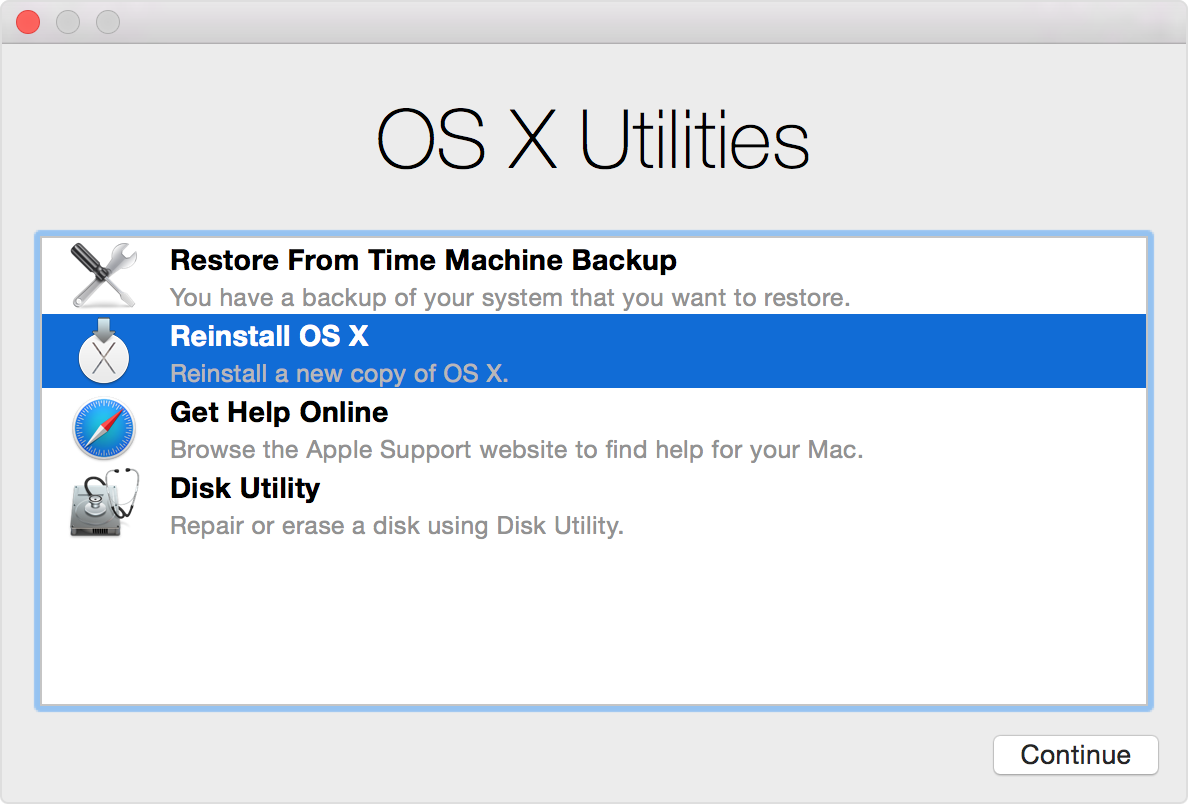
How to get into the Mac OS X Utilities
If it ever happens that something goes horribly wrong on a MacBook, Mac OS X Utilities is the place to go. By the same token, spending too much time meddling with Mac OS X Utilities is why things can go horribly wrong on a Mac, but we’ll leave that for a different post.
Resetting a MacBook to factory settings requires accessing this utility, and the way to get to that is by restarting Mac OS X, waiting for the grey slate background, and then quickly hold down the Command key, and press the R key.
This should bring up the OS X Utilities screen, on which we strongly advise treading lightly.
Disk Utility
Upon launch of OS X Utilities, we’ll open Disk Utility, which we need to erase and partition disks on the Mac to allow for a clean install.
The procedure and user interface of the Disk Utility may vary slightly according to the version of Mac OS X, but in all cases we’ll be looking for a Startup Disk, or similarly drive volume.
With the startup disk selected, we’ll click on the Erase tab, and select the Format option, and then set it to Mac OS Extended (Journaled). At this point we’ll select Erase, which will take some time to complete.
As soon as the format procedure is complete, we’ll go back to the Disk Utility menu and quit the application.
Reinstalling OS X
The great thing about MacBooks, compared to PCs, is that restoring OS X requires no physical medium to be plugged into the MacBook. Instead, the latest settings can be downloaded from Apple’s own cloud server, along with the latest updates, with the end result being the latest, best running version of OS X.
This is accomplished by returning to the main OS X Utilities menu and selecting Reinstall, which will prompt a number of confirmation screens before proceeding to the actual installation. At this point, the installation process will take over until the MacBook is back to factory settings.
Post install procedures
The first thing to do after reverting a MacBook to factory settings, is to de-authorize that device in iTunes, which should be done from a different device, may that be another MacBook or a Windows PC.
PortableOne.com specializes is custom name brand, premium laptops and no brand does premium better than Apple. Portable One offers many CTO configurations in stock on a daily basis to ship same of next business day, offers free ground shipping and low everyday prices. Oh, and no sales tax outside of California either!